Monday, April 8, 2013

Designing Classes that are Challenging with out Losing Creativity

This year was my second year teaching a weighted Anatomy & Physiology class.  Now, before I share what I found that worked - you need to understand what class structure/difficulty level when I imagine when teaching a weighted course.  (weighted = an extra point gets added to student's GPA to compensate for choosing to take a challenging class)  I designed my A&P course to be a lot like a college course with more enrichment activities.  I wanted to help my junior/seniors develop then note taking skills, study skills and have a foundation of A&P that would help them when they got to college.  The majority of my students were the top of their class, incredibly intelligent, and willing to work (although some were more stubborn than others).  :D

Not only did I want to help my kids learn the information and be challenged, but I also wanted them to enjoy the class. I am a firm believer that the kids learn more when they are interested in what they are learning.  Most of my ideas have stemmed from an online resource from various websites and then I took what I found and melded it into what I thought would work for my group of kids.  Normally - this turned into a craft project.  I am a selectively crafty person - meaning when I have a good idea, I am all gung-ho about it but I don't just do it to do it.

Some of my favorite projects are these listed below.   I have only included activities that I have pictures for - but if you want ideas/instructions/lesson plans just email me (mrs.weiss1213@gmail.com) and I will be happy to share anything you need.

Pipe Cleaner Neurons

Bone Paper Mache
 
Planes of the Body Model
 
Transparency Man
 
Vege People (for body cavities/body landmarks)
Flip Man Digestion


And my personal favorite that we did this past week (thus inspiring the blog :) )  Floor Path of Blood.  To start out this activity, I have the students take notes over the path of blood through the heart.  I purposely don't go slow, the goal is to get it on paper to serve as a reference for later.  Then I give them the path of blood worksheet and ask them to come in the following day with it labeled the best that they can - just try.


So they come in confused - so the next goal is to unconfuse them and have them walking out the door (in a 50 min class period) able to relay the path of blood with out any resources!  We start out by checking their labeling.  I do this on my iPad via the doceri app.  Then we color code the path of blood, blue for unoxygenated blood, red for oxygenated blood.

Then its time to move to the floor.  This is a picture from college at an NSTA meeting where I first attempted this activity.  I tape down a VERY ROUGH outline of the heart and the four chambers. Since college I have adapated it - there are not veins/arteries connected to the heart, we have to 'imagine' them.  I also make sure that the size of the walls in the ventricles are more realistic with the left side being thicker than the right.

Then I walk through the heart via the path that blood would take.  I do this multiple times and have the kids recite the following with me.

Superior Vena Cava -> Right atrium -> Tricuspid Valve -> Right Ventricle -> Pulmonary Valve -> Pulmonary Arteries -> Lungs to drop off CO2 and pick up O2 -> Pulmonary Veins -> Left Atrium -> Bicuspid -> Left Ventricle -> Aortic Valve -> Aorta -> Rest of the body

Then each student takes a try.  We make it a little more interactive with the whole class because the other students provide the student walking a body landmark that the blood is coming from (so they have to decide inferior/superior vena cava or the coronary sinus)  and a body landmark for where the blood is going (ascending/descending aorta)  Each students has to be able to do it all the way through with out making a mistake, or they do it again.  Of course we make this a very light hearted atmosphere.  By no means is my intention to make them embarrassed - just to make sure that when they walk out the door, they know the path of blood.

This activity is by far my favorite out of the year.  I look forward to doing it every time we start the cardiovascular system. I promise you - it works!  I also have it as an essay question on the test and I rarely have a student not get it 100% correct.  I normally see mini drawings of what was on the floor that they drew on their test as a reference.  Definitely an activity to keep doing for years to come!

As you can see, I love being creative in my classes.  I think that you can cover challenging material with your classes as long as you provide a way to remember all the key information in a creative way.  Not only does it make the class more enjoyable for the students - but they remember it!  As a side note, normally all the craft activities that I do with the kids have some sort of writting assignment that goes with it.

I have had numerous students from last year (seniors that have already graduated) that have contacted me saying that their experience in A&P has really helped them be successful in college!  Some say that when they took A&P outside of high school, they knew so much of it and it was a great starting place vs their classmates who had no background knowledge. 

Nothing is better as an educator when a former student comes back to say how much you helped them be successful after high school.  All the effort/work/creative lesson design suddenly seems like a piece of cake. 

Sunday, March 31, 2013

Using the iPad to Minimize Your Time Crunch

An educators arch nemesis is the ticking clock.

It seems that as educators we never have enough time in a day, in a plan period, in a conference, in a PD session or in our classroom to accomplish everything that we wish to.  There are so many lesson ideas out there that all good educators want to implement, but where do we find the time?!?!?

If you have seen in an earlier post of mine (found here), I have recently found the benefits of using an iPad in your classroom.  But owning the iPad is not the only step you need to take - you need to find apps that would be beneficial to your students!  Here is my list of go-to apps/programs that I love.  Keep in mind, I too encounter the time crunch and don't have an extensive list - but this is at least one to get you started.  Most are focused on the science field, but others can be adapted to to any subject across the curriculum.

First up - Doceri!  I LOVE, LOVE, LOVE, LOVE, LOVE Doceri.  I use it in the classroom to make slide shows of my powerpoints and then present to my students.  It allows me to write on the screen of the iPad instead of projecting on the whiteboard and writing on it.  I hate using the whiteboard because my back was to the students and there was always a glare I had to avoid.  With Doceri, i was able to face the students and have them participate in doing the example problems.  I also was able to create screencasts and videos for my students to use in the mastery units and also as resources at home.


Here is a video I made using Doceri about momentum.


My second favorite application is Dropbox. Dropbox is basically a cloud where you can store all your documents.  I have it installed in my home laptop, my iPad, my phone and my school desktop so that where ever I am - I can have access to all my folders and documents.  This has saved me SO much time because I used to put everything on a flash drive and then I would forget it at school.  Or I would have to email myself back and forth to send documents home to work on them and then forget to email myself back with the edited documents. Dropbox has completely eliminated all of those issues for me.

I have also used dropbox in school to help make things go more eco-friendly.  With my A&P classes we set up a collaborative folder that all of my students had access to.  This is where I would post documents/examples/links/rubrics they needed to complete a project. They would also post in here if they did a powerpoint presentation to make the transitions between presenters more smooth.  Then each student had a folder that they labled "A&P Grades - their initials."  Only that student and myself had access to it and this is where they would turn in their ppt, papers, popplet etc to be graded.  I would then post back a picture of their graded rubric.

In my freshmen Physical Science my kids all have access to the same dropbox account (a general one I created solely for their class) and it has all the documents they need for their mastery level units.  They log on and they print out the assignments they choose to do and I don't have to waste paper printing out the assignments they did not want to do. 


Next up is Popplet!  Popplet is a graphic organizer maker that is all online.  Once you create your account you can access all your popplets on a desktop, iPad, or phone device that you have installed the app.  I love it because my kids can add me as a 'collaborator' and I can see exactly what they have gotten done everyday.  You can make them as big as you would like (no running out of room on the paper) and you can color-code/edit/insert pictures and links.  I love it.


 AutoRap is one of the newer apps I have downloaded.  I have a colleague that teaches a foreign language that has used it more than me - but it is freaking fun!  All you do is talk into the app and it then converts what you said into a rap.  This is fabulous for people like me who don't feel very creative when it comes to rapping - but this does it for me!  What a way to get kids more interested in something that isn't just a lecture - but its still giving them in the information. 

Bamboo paper is awesome!  I have used it for multiple professional and personal reasons!  You can create notebooks for different subjects and then add in pictures or whatever you want to do.  I did my grading for a project all paperless with bamboo paper and dropbox.  Here's how:
  1.  Took a screenshot of the rubric in dropbox (do this by clicking the sleep button and the home button simultaneously)
  2. Went into Bamboo Paper and inserted the screenshot of the rubric. 
  3. While the student was presenting/me reading their paper/reviewing the popplet/reviewing their ppt  i was writing on the rubric.  
  4. When i finished scoring, I took another screen shot of the rubric. Then upload the screenshot picture to the individual grade folder of each student.  (remember, only the student and I have access to the folder that has their grade in it.)
  5. It sounds complicated - but its actually really easy once you get the hang of it.  And its completely paperless - talk about going green!


I use the Elsevier Sobotta Atlas with my A&P the most.  I LOVE THIS APP.  It was pricey - and I realize not most people want to spend this kind of money...but i promise you that it is worth the investment!  Not only do you have access to some awesome pictures, but it also shows small pieces of information with each picture, you can chose to put labels on or off, it has a training mode where it quizzes you on the anatomy using the pin function.  It has pictures of medical traumas and CT scans (normal and abnormal).  In short words: IT IS EPICALLY FANTASTIC!


Pocket Brain is also an app that I love when discussing the CNS.   It has the ability to take off and add layers of the brain and then has pins where it will tell you what it is pointing to and give information about that structure.  and - it looks 3D!  You can rotate the brain sideways, up and down and manipulate it any way you want.


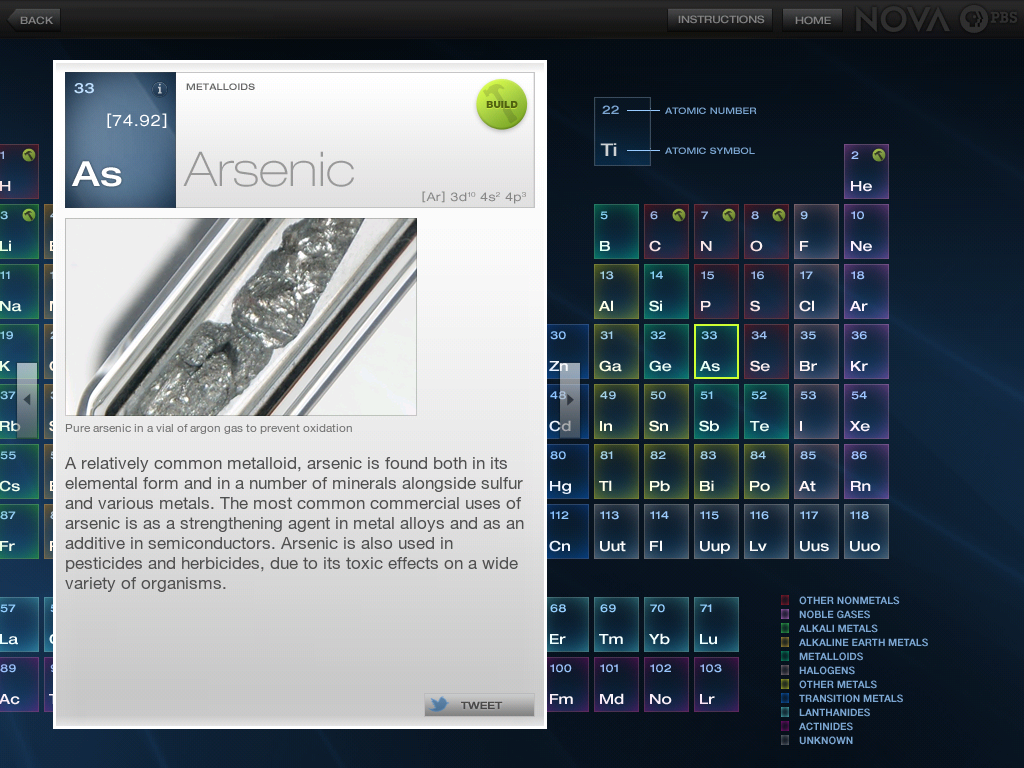
Nova Elements is an app I would use with my freshmen Physical Science.  It has an interactive periodic table that has a lot of good information on it. It also has an element builder where you can add in the number of protons, neutrons and electrons. 


 Gas Laws HD is an app that shows Boyle's Law and Charles' Law.  You can collect 'data' from it and then graph the relationships within the gas laws.


These are just a few of the apps that I have found the most successful in my classes of Physical Science and Anatomy & Physiology.  If you have any questions of how I have used them - feel free to comment and I will try to respond in a timely manner.  Hopefully this helps you with your limited time schedule to grasp how useful and fun your iPad can be in your classroom. 

Tuesday, March 26, 2013

Putting the Learning Back in the Students' Hands

This year has been interesting to say the least!  I have five classes of freshmen physical science and only one of A&P vs last year when I had an even split of the two classes.  This year OGHS has implemented the POI policy.  POI stands for Power of I Can Do This or Power of Incomplete.

#1:  Power of I Can Do This: For this POI policy, the kids have to score a 70% or higher on each test.  If they do not reach the 70% score, they have to retake the test until they do reach the benchmark.  When we enter the grades in the gradebook, we average their highest score with the initial score and record it. The goal of this policy is to encourage the kids to study for their tests and be more confident test takers.

#2: Power of Incomplete:  For this POI policy, the kids have to complete/turn in every assignment before they can take their test.  If they do not turn in an assignment when it is due - they then only receive 50% earned credit.  If they do not have all the assignments turned in by the test day; they then cannot take the test and they have to take the test either before/after school within the next few days.  The goal of this policy is to teach the kids how important it is to do all their homework.

Now, for this class of freshmen; we have tried both policies.  We started out this Fall Semester with the Power of Incomplete and ran into issues of the students holding back assignments to have more time to study for the test and they did not see the 50% reduction on the homework as a consequence.  So we switched to the Power of I Can Do This...again - I was seeing issues where it was not serving its intended purpose.  Some students were still using it as a crutch and would come in expecting to get a POI but it was 'okay' because they then got another chance to raise their grade.

Despite all these efforts, I decided they needed a change.  So I flipped the classroom set up on them.

At the beginning of the year we would follow this set up for instruction:  we would lecture over concepts, do practice worksheets, do an activity to reinforce, more lecture, worksheets, reinforcement activities and repeat until test day.  Homework/activities are roughly worth 40% of their grade and then the test is roughly 60%.   This wasn't working for this group of kids - so I changed it.

We started our Mastery Level Project and the points are broken down like this:
  • Participation Points: 2 pts for everyday of productive work (they actually have to be working, not just visiting/wasting time)  If they are absent they have to make up the time they miss either in free time (we have time built into everyday),  before school or after school.  
  • Mastery Level: explained below - 100 pts
  • Test - same size test as normal but only worth 30 pts 
As you can see from the point values - the main focus is on the students Mastering concepts; not just memorizing facts but actually understanding the material.

So here is how the Mastery Levels work - I gave them the requirements for each grade level (D, C, B or A).  Everyone starts out striving for the D, when they finish it they can start the C, when they finish that they start the B and so on.  They are given workdays in class everyday to work up the mastery levels as far as they want to.  I have each of them set a grade level goal and they work to achieve their goals.  They have to complete the D level as a minimum but they are encouraged to work as far up the mastery level as possible. The key is that they have to complete the assignments within the mastery levels with 100% accuracy before they can move on.  If they get a question wrong; I mark it and they take it back and try again.  It is not counted against them, but the goal is for them to learn it and fix their mistakes.

The first time, we set up the assignments where they have 2 or 3 assignments per grade level.  They have to finish an entire grade level to get the grade (65/100, 75/100, 85/100, 100/100) and if they don't finish they fall back to the previously completed grade level.   The second time we did it (currently in this unit) I gave them choices.  They had to complete 2 of 5 possible assignments for each grade level.  They asked for the choices - so I gave it to them.  No matter what, the D level provides them with all the information and the higher mastery levels deepen their understanding/reinforce what they learned as a baseline in the D level. 

My kids like it because they are able to work at their own pace and actually comprehend instead of working at their classmates pace.  I love it because I feel like I have been able to give them more freedom, help them more one-on-one, watch them control their learning and success.  We have been able to do more exciting activities that involve technology and higher DOK.  Instead of just doing the demos in front of the class; they get to do them, instead of mentioning careers that utilize the information; they get to research them and interview people who live the careers.  I feel like  I have worked less at home (grading/planning) yet the new system has made me a more effective teacher.

I love that the teaching has been put back in the kids hands and they are in charge of how good/bad they do.  They know how they learn best - so why not let them do it?
 

Connecting the iPad to my Projector

I have never been the 'techy' kind of person...until I bought and iPad on a whim!  Yes, I was a complete sucker for the Black Friday ads and convinced my husband to let me get an iPad!  I sold it to him by saying I would use it for school - yet I had no idea the world of possibilities that awaited me in the world of 2.0 education. 

My first challenge with my iPad was figuring out how to hook it up to my projector in my room.  I soon found out that just a small screen was not going to cut it when trying to show things to my kiddos so I had to hook it up to some sort of projection device in order to make it work.  So this started me on my treck to figure out what works...and more offten than not - what does not work.

I found the Doceri app and I LOVE IT!  It allows me to control my laptop on my iPad or to directly show what is on my iPad in the doceri app onto the computer screen.  The downfall was that I couldn't show any other of my neat apps that I found, I could only show what was in the Doceri program. 

My next challenge was to connect my desktop to the iPad via Doceri - I figured it was at least a stepping stone compared to not using the iPad at all.  Well...the initial few tries was a fail.  But what I did figure out is how to finally do it. 

First - I had to get my desktop wireless!  This is fairly easy, all you need is a Wireless USB Adapter (roughly $40) Then your desktop and your iPad need to be on the same wireless network that does not have a ridiculous amount of firewalls that prevent the ability to control another device.  Then you need to download AirServer on your desktop.  (teachers -$11.99, others - $14.99)  Click here to download.  This license will allow you to put AirServer on multiple devices.  I used my licenses on my laptop at home, my desktop and I have an extra if needed somewhere else.  You do not need to put it on your iPad - it comes in already installed. 

Once AirServer is installed on your desktop (make sure it is on - you should see the icon in your bottom toolbar).  Double click the home button on your iPad and scroll all the way to the left. 

Click on your computer and turn mirroring on.  You should see what is on your iPad on the computer screen now.

If you are doing this at school and your desktop is hooked up to your projector - turn your projector on and WAH BAM!  It WORKS!!!!  You should be as excited as I was :) 


Since I have hooked up my iPad I have used Doceri multiple times with my classes for going through PowerPoints and showed them a lot of apps.  I have really lucked out because I teach Anatomy and Physiology and there are TONS of apps out there for the medical field.  It is very cool to show my kids CT scans, XRays and abrasions that I would otherwise have more difficulty either interpreting (most have descriptions to use) or showing them the content.  I also use it with my freshmen Physical Science to look at the elements on the periodic table, building atoms and showing the basics physics concepts. 

The bottom line - I may have been a sucker for good marketing when buying my iPad, but my kids have reaped the benefits of what it has to offer in the classroom.